Installing the 2 nodes of the cluster
The first step in the setup is to prepare the 2 nodes of the cluster. I have used Oracle enterprise linux 6.6 for the setup. You can use any OS of your choice supported by symantec. The VMs configuration is as follows :
HDD - 20GB
RAM - 1GB
Processor core - 1
NIC cards - 3 (bridged network)
IP address - 192.168.1.110 (node01) and 192.168.1.111 (node02)
Netmask - 255.255.255.0
Gateway - 192.168.1.1
I’ve attached few important screenshots of the installation of node01. The rest settings are easy and does not affect out setup.
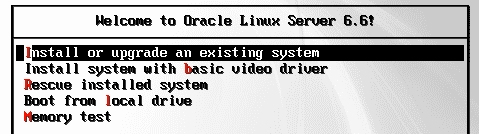
Select the install or upgrade an existing system option after booting the VM for the first time.
Select the basic storage device for the installation of OS.

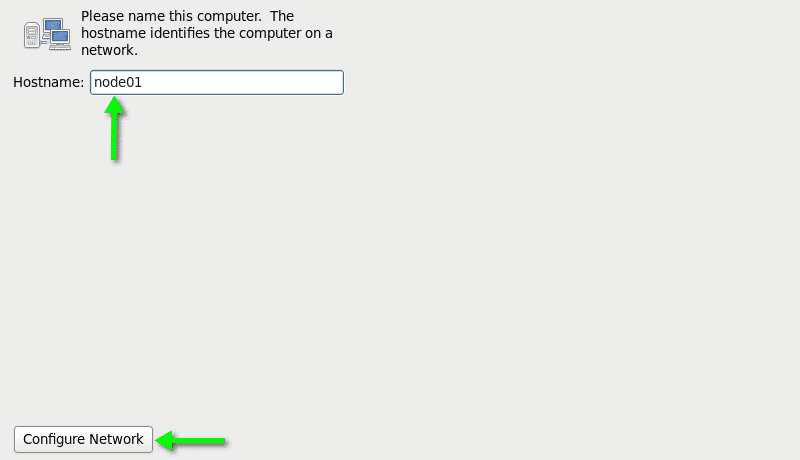
Provide the hostname as node01 for the VM and click on the configure network button to configure the network for the public interface eth0.
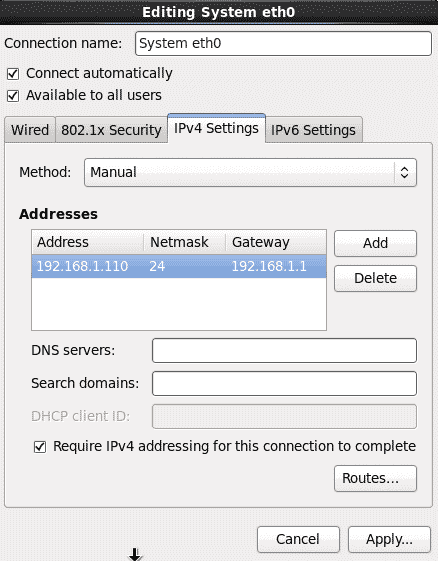
Make sure you provide proper IP address, gateway and netmask for the public interface.
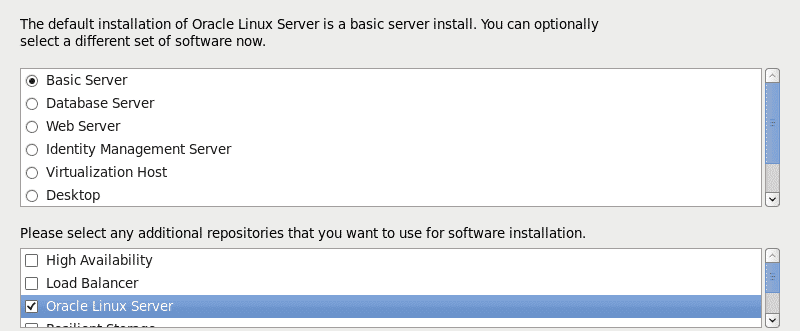
select a basic server install and additional repositories that you want. I will be adding additional repositories after the installation is complete.
You can refer this link, for a detailed installation of OEL
Setting OEL with public Repositories
This is important in order to have a successful SFHA installation. The installer will ask for installing some missing rpms, for which it needs to have access to all the public repositories. To be able to access public repositories we need to add a DNS server in the resolv.conf file:
# vi /etc/resolv.conf
nameserver [DNS_SERVER_IP]
Check the wifi router setting or ipconfig /all command if you are using windows to get the DNS server IP.
Download the yum repo file from http://public-yum.oracle.com.
# cd /etc/yum.repos.d
# wget http://public-yum.oracle.com/public-yum-ol6.repo
Run yum repolist in make sure you have configured all the latest repositories.
# yum repolist
Setting up the /etc/hosts file
In order for local name resolution to work, edit the /etc/hosts file to have the entries of both the nodes on each VM.
[root@node01 ~]# cat /etc/hosts
127.0.0.1   localhost localhost.localdomain localhost4 localhost4.localdomain4
::1         localhost localhost.localdomain localhost6 localhost6.localdomain6
192.168.1.110   node01
192.168.1.111   node02

[root@node02 ~]# cat /etc/hosts
127.0.0.1   localhost localhost.localdomain localhost4 localhost4.localdomain4
::1         localhost localhost.localdomain localhost6 localhost6.localdomain6
192.168.1.110	node01
192.168.1.111	node02
Setting up passwordless ssh
The installer requires passwordless ssh between the hosts. The installer can itself configure passwordless ssh for you. In case you want to configure it manually, follow the steps below. First, Generate the rsa key for node01.
[root@node01 ~]# cd ~
[root@node01 ~]# ssh-keygen -t rsa
Generating public/private rsa key pair.
Enter file in which to save the key (/root/.ssh/id_rsa):
Created directory '/root/.ssh'.
Enter passphrase (empty for no passphrase):
Enter same passphrase again:
Your identification has been saved in /root/.ssh/id_rsa.
Your public key has been saved in /root/.ssh/id_rsa.pub.
The key fingerprint is:
ab:42:0d:86:34:f6:6e:9f:23:b1:ea:08:98:00:f4:81 root@node01
The key's randomart image is:
+--[ RSA 2048]----+
| ...             |
|.E= .            |
|.o =             |
|. . +            |
|.  o o  S        |
|o.  = .  .       |
|+  o + ..        |
|..  + +.         |
|..o. o..         |
+-----------------+
Now copy the id_rsa.pub from node01 to the file /root/.ssh/authorized_keys of node02. Append the key to the authorized_keys file in case the file is present having existing keys for other hosts. Otherwise create a new authorized_keys file.
[root@node01 ~]# scp /root/.ssh/id_rsa.pub node02:/root/.ssh/authorized_keys
Similarly perform the exact same steps for the node02 and confirm by doing ssh from each node to other node.
VCS cluster 6.2 LAB : Installing and configuring OEL
VCS cluster 6.2 LAB : Installing Open-E DSS
VCS cluster 6.2 LAB : Configuring Open-E DSS
VCS cluster 6.2 LAB : Installing VCS