Now comes the last step in this series to create a VCS LAB. We need to copy the installation media to one of the VMs. We would use shared folder feature of VMware workstation to copy the install media into the node geek01.
To enable sharing goto VM > Settings . On the options tab select shared folders. Add the folder you want to share from the host machine. Note that sharing feature is enabled only when you install VMware tools into the guest VM. After you have shared the folder from host machine, you can access it in /hgfs in the solaris virtual machines.
One more important thing to remember is copy the install media from shared folder to a directory in VM, like /var/tmp and run the installer from their. This is to avoid any unnecessary permission issues in the host machine. Run the installer as shown below :
# cp /hgfs/shared_folder/VRTS_SF_HA_Solutions_5.1_SP1_Solaris_x64.tar.zip /var/tmp
# cd /var/tmp/
# unzip VRTS_SF_HA_Solutions_5.1_SP1_Solaris_x64.tar.zip
# tar -xvf VRTS_SF_HA_Solutions_5.1_SP1_Solaris_x64.tar
# cd dvd2-sol_x64/storage_foundation_high_availability
# ./installsfha
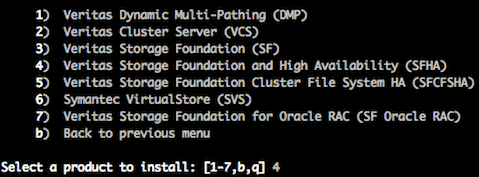
Select I to install a product
We will be installing the product Veritas storage Foundation and High Availability.
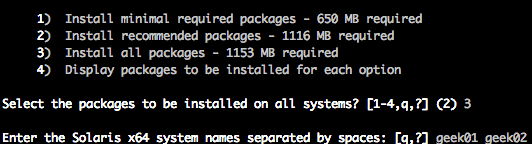
Select option 3 to install all packages. Input the hostnames of the 2 systems in the cluster separated by spaces.
The installer will now do the pre checks. You will get a warning of updating some parameters in /etc/system and reboot. You can ignore this and continue the installation as we wiill be rebooting the system after the installation is complete.
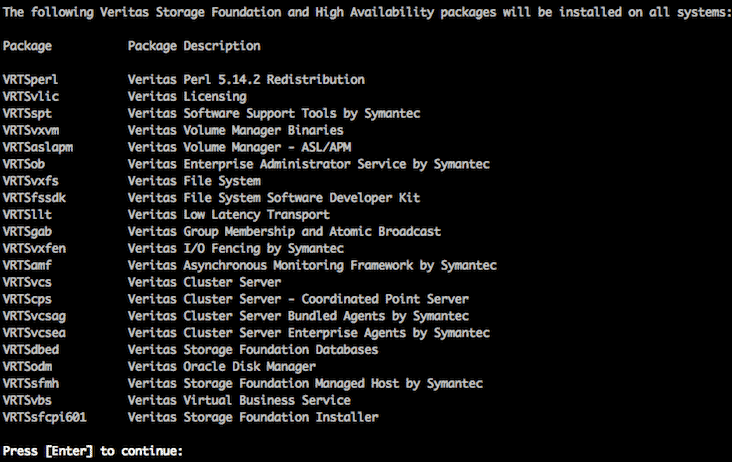
As shown below, the packages listed will be installed on all the systems in the cluster. The installer will install all the package shown in the list.
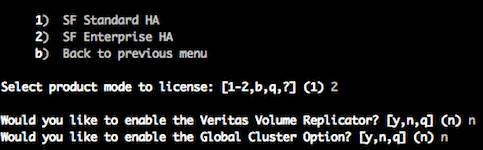
We would be using a keyless licensing for this LAB setup, so select option 2.
Select SF Enterprise HA as the mode to license. We do not need the VVR (veritas volume replicator for the LAB). Also we do not want to configure a Global cluster.
The installer will install the VRTS SFHA successfully. Reboot the system before configuring the cluster. To start configuring the cluster after rebooting both the nodes, Run below command and input the 2 systems in the cluster separated by spaces.
geek01 # /opt/VRTS/install/installsfha601 -configure
The installer will do some pre checks. There is no need to sync time by NTP. The next important step is to configure I/O fencing. Choose to configure I/O fencing in enabled mode.
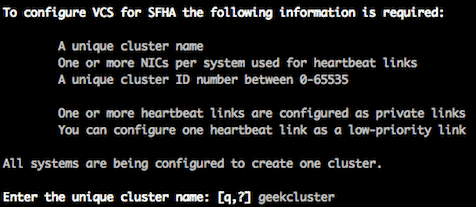
Enter a unique cluster name for the cluster – geekcluster
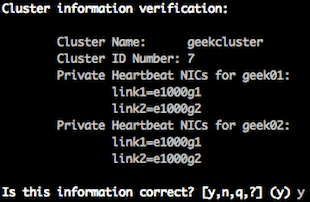
Now select e1000g1 and e1000g2 as the LLT interconnects. Select a unique cluster ID for the cluster and if necessary get the uniqueness of cluster ID checked by the installer. Confirm the changes after verifying.
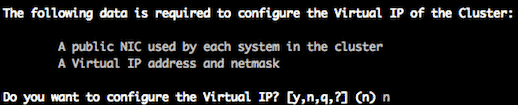
The cluster can be connected using a virtual IP rather than the physical IPs of the cluster nodes. For the LAB setup we would not use a virtual IP.
We do not need a secure cluster setup for the LAB environment, hence answer “n” . Also we do not need SMTP or SNMP configuration. A default user “admin” with password as “password” would be created to administer the cluster. You can add more users if you want. For LAB setup we would only keep the default admin user. We need to stop SFHA process to continue the installation. The installer will start it automatically.
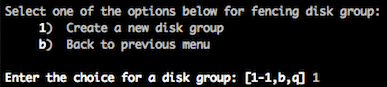
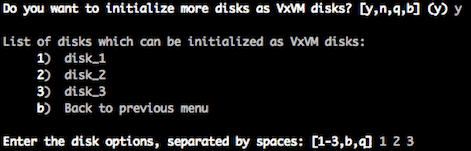
For the I/O fencing configuration select disk based fencing option. I do not have a fencing Disk group already created , So I would allow the installer to create new disk group for fencing. The installer will also initialize the 3 disks added from the openfiler storage. The disk policy for I/O fencing configuration would be raw. In case you are using vxdmp, select dmp.
The configuration will finish successfully and you have the complete setup up and running. Make sure you properly shutdown and bring up the host in the virtual LAB environment. I hope the post was informative. Do subscribe the blog to stay updated with latest posts.
VCS cluster 5.1 LAB using VMware workstation : Installing solaris
VCS cluster 5.1 LAB using VMware workstation : Installing openfiler
VCS cluster 5.1 LAB using VMware workstation : Configuring openfiler
VCS cluster 5.1 LAB using VMware workstation : Installing VCS